Coding in GCP Kaggle Docker Image environment with local VSCode
In this document I will walk through the procedure of configuring Google Cloud Platform (GCP) to run a Kaggle Docker Image environment. I will detail how to connect a local Visual Studio Code (VSCode) editor to the remote environment and pay attention to potential issues that might arise on the way to accomplish this goal. Excellent external reference are provided for advanced readers.
GCP + Kaggle Docker Image
Enable Notebooks API first - by searching for this product in the magnifier box. If not, as you proceed to the next step, you will find the GPUs option is missing in the Quota page.
Requesting a GPU quota Increase - Be sure to upgrade your Google Cloud account in advance if your computation is GPU intensive. Go to IAM & Admin > Quotas > Filter > Limit name: GPUs (all regions) > ALL QUOTAS in the Compute Engine API row > Check the row whose location is Global and then click EDIT QUOTAS to increase the limit to one. The request won’t be sent until you fill in your phone number and reason for increasing the quota.
Besides, we need to determine which region our instance should be associated with and make another quota increase request for this region as well. Again, go to Filter > Limit name:
NVIDIA T4 GPUs> Make a request for the Compute Engine API entry.The size of disk has better to be much larger than 50 GB because the default images has taken up approximately
50 GB.Start an GCP AI Platform Notebook - Navigate to AI Platform in the left panel of the GCP console. Click Notebooks > New Instance > Customize Instance > Fill out instance name, region, zone and select Kaggle Python [BETA] in box Environment > Specify the number and type of GPU you like to use > Check “Network in this project” > Uncheck “Allow proxy access when it’s available.” Now if you navigate to VM instances you should see a new instance already being created for you. Launch the instance by clicking either START/RESUME in the VM instances page or START in the AI Platform page.

Go to Compute Engine > Click the SSH button associated with the VM instance. Check to see if the connection is successful.

Connect to the instance -
Preliminary: For managing multiple user information/account on the local machine’s GCloud, see reference here.
- To create a new credentials for new account
$ gcloud auth login
$ gcloud config configurations list
$ gcloud config configurations activate [config-title]
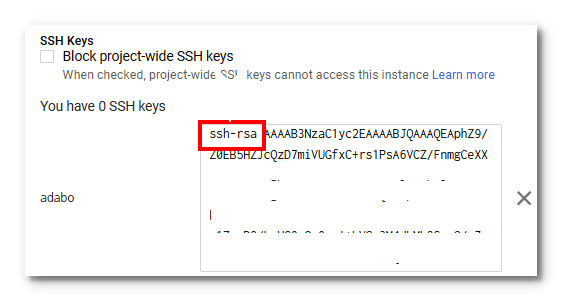
# example about configuring computer region $ gcloud config set compute/region us-east1Save Public SSH Key to the instance - Navigate to Compute Engine > EDIT > Copy and paste your public key into the blank box under the SSH Keys section. And restart your instance to let the setup take effect.
Activate the notebook - Click CONNECT of the notebook you are about to work on. In the current example, the notebook name is “kaggle-test-1.”

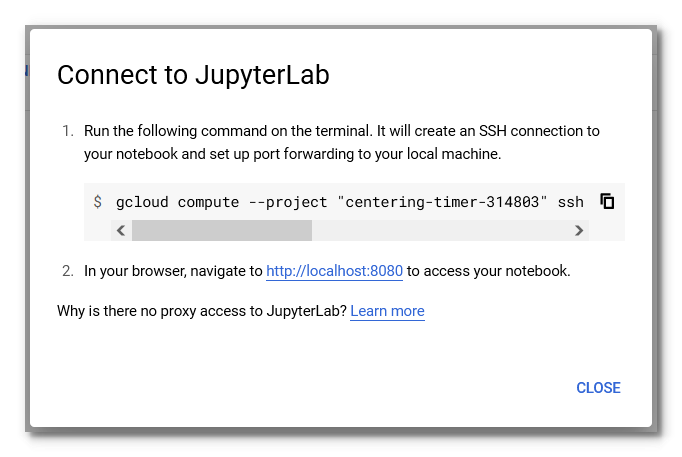
Copy and paste and run the command in the GCloud terminal. It will create an SSH connection to your notebook and set up port forwarding to your local machine.
Trouble shooting - If you encounter the following error message:
Network error: Connection refused.
You should check if Port 22 is blocked.
Failed Code: 4003 Reason: failed to connect to backend.
You forget to start or resume the instance.
Network error: Software caused connection abort.
Your Port 22 is blocked or the firewall rule has not been established.
Connection error: The process tried to write to a nonexistent pipe.
For simplicity, just delete the
known_hostfile underC:\Users\[your-username]\.sshand relaunch the VS Code to reconnect the remote server. Everything should work normally afterward.The Python Tools server crashed 5 times in the last 3 minutes. The server will not be restarted.
To resolve the fifth issue, either check out this post or simply fully uninstall your VS Code including extensions (follow this post) and reinstall. I adopted the second method for the same issue that costed my three workdays and fix the issue in ten minutes.
Try the following potential solutions for the errors mentioned above:
Check if your compute/region and compute/zone are set correctly.
Check if your public SSH key is configured correctly in the instance’s EDIT page.
If the remote machine’s firewall rules doesn’t allow connections on port 22. Check here for the detailed solution (Reference 1 and Reference 2). Here is the summary:
This method works well for me. Turn off the instance if it is running. Go to Compute Engine > VM instance details > edit the instance by clicking on the EDIT button > Custom metadata > create a key named startup-script with value suggested as seen below. Don’t forget thesudobecause oftentimes we often login the remote machine as a root user:#! /bin/bash sudo ufw allow 22Now click SSH next to the working instance from the computer engine page to test if the setting is in effective. To my memory, the SSH connection didn’t work at the first try. After waiting for a couple of minutes, I retried and successfully saw the welcome message of the remote machine. Be patient! Then test if the SSH connection can be established through VS Code.
If the remote server needs a firewall rule for port 22, which in most cases it is configured by default though, check this post for details. Reference
- First, go to VPC network > Firewall > clear ALL the existing setting in the Firewall page of VPC network.
- Second, create a new firewall rule. Name:
allow-ingress-from-iap> Direction of traffic:Ingress> Target:All instances in the network> Source filter:IP ranges> Source IP ranges:0.0.0.0/0> Protocols and ports: Select TCP and enter 22 to allow SSH > Click Create. - Again, click SSH button next to the working instance on the computer engine page to see if the connection is successful. Then test if you can access the server through VS Code.
Establish the SSH connection: Method 1. In VS Code, install Remote - SSH. Set up your SSH key, configure the config file in folder
.ssh, and make a connection.Establish the SSH connection: Method 2. Here is an example of the command you will put in the GCloud terminal’s command line:
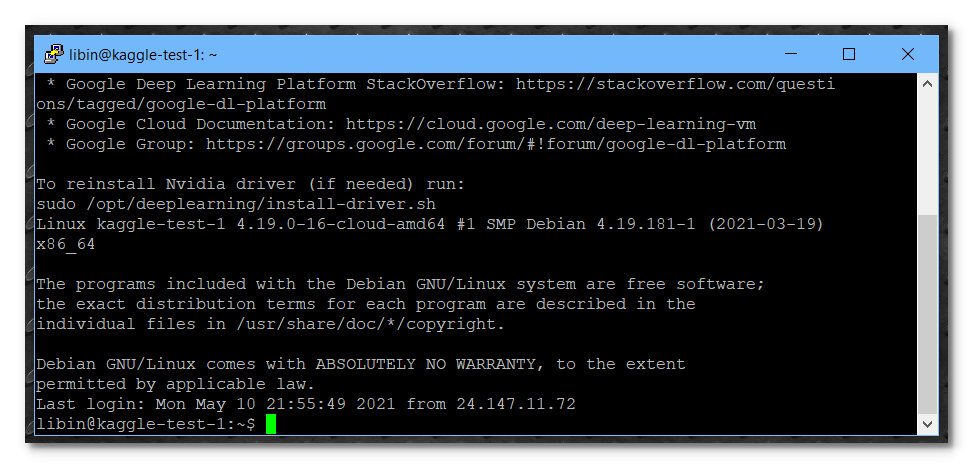
$ gcloud compute --project "strategic-howl-305522" ssh --zone "us-east1-c" "kaggle-test-1" -- -L 8080:localhost:8080You should see the following window, if the aforementioned steps are executed properly:
Stop pre-installed Docker container - As explained in this excellent post we need to stop the pre-installed docker container before our subsequent tweak. Before doing that, let’s take a glance at the disk volume which has been taken up by default.
# show all container
docker ps -a
# return each container's restart policy in designated format.
# reference: https://tinyurl.com/ydrtuwur
docker inspect -f "{{.Name}} {{.HostConfig.RestartPolicy.Name}}" $(docker ps -aq)
# stop a specific container. In our case, payload-container
docker update --restart no payload-container
docker inspect -f "{{.Name}} {{.HostConfig.RestartPolicy.Name}}" $(docker ps -aq)
docker stop payload-container
docker ps -a
Install
docker-compose.sudo curl -L "https://github.com/docker/compose/releases/download/1.29.1/docker-compose-$(uname -s)-$(uname -m)" -o /usr/local/bin/docker-compose sudo chmod +x /usr/local/bin/docker-composeTo list and remove dangling images that are no longer referenced, we run the following command:
# to list
docker image ls -f dangling=true
# to remove
docker image rm $(docker image ls -f dangling=true -q)
# or we can simply use the `prune` subcommand
docker image prune
# in case we want to remove all images at once
docker image rm $(docker image ls -q)
# get an overview of the docker environment docker system df
- Images: The size of the images that have been pulled from a registry and the ones built locally.
- Containers: The disk space used by the containers running on the system, meaning the space of each containers’ read-write layer.
- Local Volumes: Storage persisted on the host but outside of a container’s filesystem.
Create a custom-made image - To do so, I download the excellent sample repository prepared by susumuota and make some trivial tweaks simply for my own preference.
# go to your home directory
cd ~
git clone https://github.com/susumuota/kaggleenv.git
cd kaggleenv
As noted here by susumuota, the patch shown below works for v99 (and also v100 based on my own experiment). There might be inconsistency issue when we apply this patch to newer versions of
jupyter_notebook_config.py. How do we deal with this problem? See the paragraph following the subsequent code block.# Keep the default dockerfile intact # Modify the jupyter_notebook_config.py.patch file --- jupyter_notebook_config.py.orig 2021-02-17 07:52:56.000000000 +00 +++ jupyter_notebook_config.py 2021-04-05 06:19:23.640584228 +0000 @@ -4 +4 @@ -c.NotebookApp.token = '' +# c.NotebookApp.token = '' @@ -11 +11,2 @@ -c.NotebookApp.notebook_dir = '/home/jupyter' +# c.NotebookApp.notebook_dir = '/home/jupyter' +c.NotebookApp.notebook_dir = '/kaggle/working'Create a new path for jupyter_notebook_config.py - Connect to the Jupyter server using a browser rather than VS Code for convenience > Start a new terminal session > In the command line, navigate outside the working directory
/kaggle/workingby runningcd /opt/jupyter/.jupyter. You would see the defaultjupyter_notebook_config.py. Copy this file and save it asnew_juconfig.py. Edit thenew_juconfig.pywith the goal to remove thec.NotebookApp.tokenline, comment the oldc.NotebookApp.notebook_direline, and finally add a newc.NotebookApp.notebook_direwith desired working directory update. > Then rundiff -u jupyter_notebook_config.py new_juconfig.py > patch. You will obtain a patch filejupyter_notebook_config.py.patch. Replace with this newly obtained the same file prepared by Susumuota in thekaggleenvdirectory (if you follow my steps from the beginning). Then you are done.Note: If you are making a change for an already running container, you need to stop and remove the container and start again.
# filename: Dockerfile (keep it intact)

# for CPU
# FROM gcr.io/kaggle-images/python:latest
# for GPU
FROM gcr.io/kaggle-gpu-images/python:latest

# apply patch to enable token and change notebook directory to /kaggle/working
# see jupyter_notebook_config.py.patch
COPY jupyter_notebook_config.py.patch /opt/jupyter/.jupyter/
RUN (cd /opt/jupyter/.jupyter/ && patch < jupyter_notebook_config.py.patch)

# add extra modules here
# RUN pip install -U pip
Before moving on, I create the following folders to mimic the folder system in a typical kaggle kernel: (1)
/home/libin/kaggle/working, (2)/home/libin/kaggle/input, and (3)/home/libin/kaggle/output.# filename: docker-compose.yml version: "3" services: jupyter: build: . volumes: - $PWD:/kaggle/working working_dir: /kaggle/working ports: - "8080:8080" hostname: localhost restart: always # for GPU runtime: nvidia # limit log size logging: driver: "json-file" options: max-file: "5" max-size: "10m"Now, begin to build the image
# build the image
$ docker-compose build
# confirm the image
$ docker images
# start Docker container in the background. The -d options runs the docker application in the background as a daemon. $ docker-compose up -d # list the containers $ docker ps -a # Return low-level information on Docker objects $ docker inspect -f "{{.Name}} {{.HostConfig.RestartPolicy.Name}}" $(docker ps -aq)# Get the URL to enter Jupyter Lab $ docker-compose logsCopy and paste the Jupyter notebook URL into your browser. If your SSH key is set up correctly, you will see Jupyter Lab show up in your browser.
Every time you restart the Compute Engine instance, navigate to
/home/libin/kaggleenvand rundocker-compose logsto receive the URL to enter the Jupyter Lab notebook.(Optional)
- To remove the dangling image, run
docker image rm $(docker image ls -q)ordocker image prune. - To remove all the stopped containers, run
docker container prune. - To clean the docker at system level so as to reclaim all the unused disk space at once, run
docker system prune.
- To remove the dangling image, run
VSCode
The version of VS Code I have tested for the following installation is 1.53.2 (January 2021). Note: Don’t use the version 1.57.1 (May 2021). It has a new feature, restricted mode, which seemed to block my SSH connection.
Configure VSCode.
Take note of the external IP address of the instance shown in GCP console. Then launch your local VSCode editor and open
SSH configuration fileto edit the SSH connection specification for the remote instance.Since VSCode requires a
.pemprivate SSH key file to access the GCP instance, be mindful to use software likePuttygento convert your private SSH key file to.pemformat.- Start PuTTYgen > Load the .ppk file > From the menu at the top of the PuTTY key generator, choose Conversions, Export OpenSSH Key. Name the file and add the
.pemextension.
- Start PuTTYgen > Load the .ppk file > From the menu at the top of the PuTTY key generator, choose Conversions, Export OpenSSH Key. Name the file and add the
You should see the following message with your own token changing every time you restart the container:

Copy the whole line that contains the token. You will paste it into VSCode later.
SSH into the instance from VSCode
Step 1. Edit the SSH configuration file. Launch your VSCode editor and click
Remote SSH: open configuration file. Insert a new entry to represent the newly created instance like this:
- You can assign any name you like to the Host filed.
- Copy and paste the external IP address of your instance to the HostName field.
- The Username has to be the same as the the corresponding key comment of the Public SSH key you stored in the instance’s EDIT page.
- The Port is 22 by default for an instance in Computer Engine.
- Be sure to have your Private SSH key in
.pemformat and write out its full path when filling out the IdentityFile field.
Activate the connection by clicking on Remote Explorer:
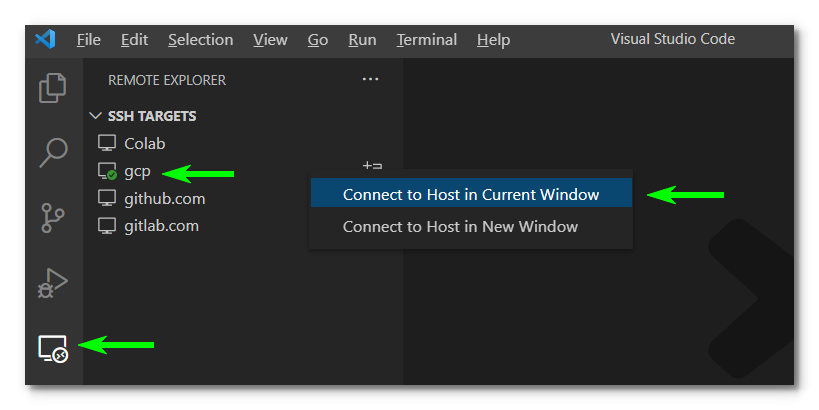
Install extensions you need after clicking on
Extensions: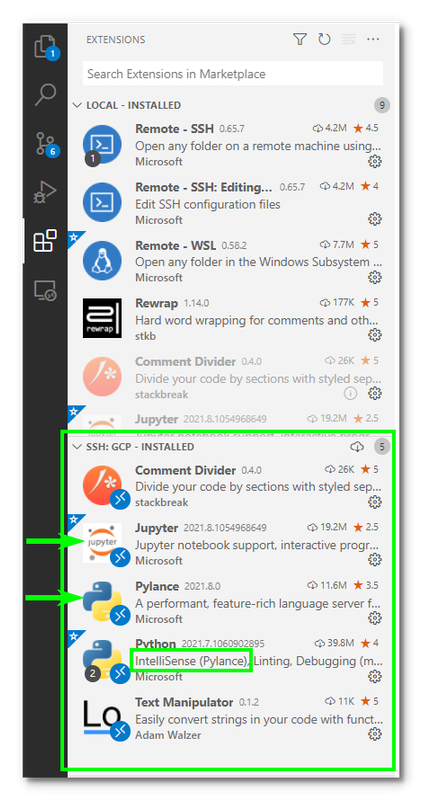
You need the Python extension to connect the local client (your laptop) to the remote Jupyter server.
You have two methods to work inside the Kaggle Jupyter environment, after receiving the assigned Jupyter server URL from the command
docker-compose logs(Trouble shooting: If you cannot find the URL for the Jupyter server, then restart your VM instance and reconnect your VS Code with the remote server):- (1) tell your VS Code IDE the remote Jupyter server on GCP for connection, and
- (2) paste and run the given URL into your browser.
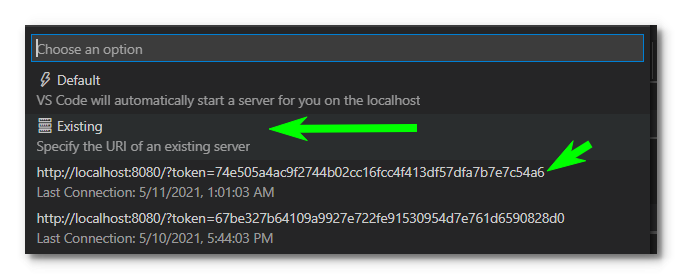
Let’s walk through the procedure of Method 1. Open command palette by clicking on Ctrl + Shift + P. Search for
Jupyter: Specify local or remote Jupyter server for connections. (In older version of VS Code, the option would bePython: Specify local or remote Jupyter server for connections). Paste into the blank the whole line that contains the randomly assigned token to access your Jupyter server.- Be sure your working directory is
kaggle. Otherwise, the Jupyter server doesn’t exist. - The environment that has the complete list of Python packages as you would expect in a Kaggle kernel can only be accessed through the aforementioned two methods: (1) a VS Code IDE with the connection to the Jupyter server inside the container, or (2) an internet browser to serve as a web-based IDE. Therefore, if you work directly in the Linux CTL, even in the directory of the Kaggle docker files, you won’t find a Python virtual environment as configured in a Kaggle kernel.

Now you’re all set. Both script mode and Jupyter notebook mode are under your command. Happy coding!
Troubleshooting:
If the enter button becomes out of work after you copy and paste the URL into the Choose an option box. Just leave the URL there. Close the dialogue window by click the ESC button. Then reopen the dialogue window, choose Existing and then the URL you just entered should show up by default. This time the enter button should work normally.
If the connection to Jupyter server is cut off, just reload Python to reestablish the connection.
After a successful connection, in a
.pyor.ipynbfile, you should see buttons to execute code.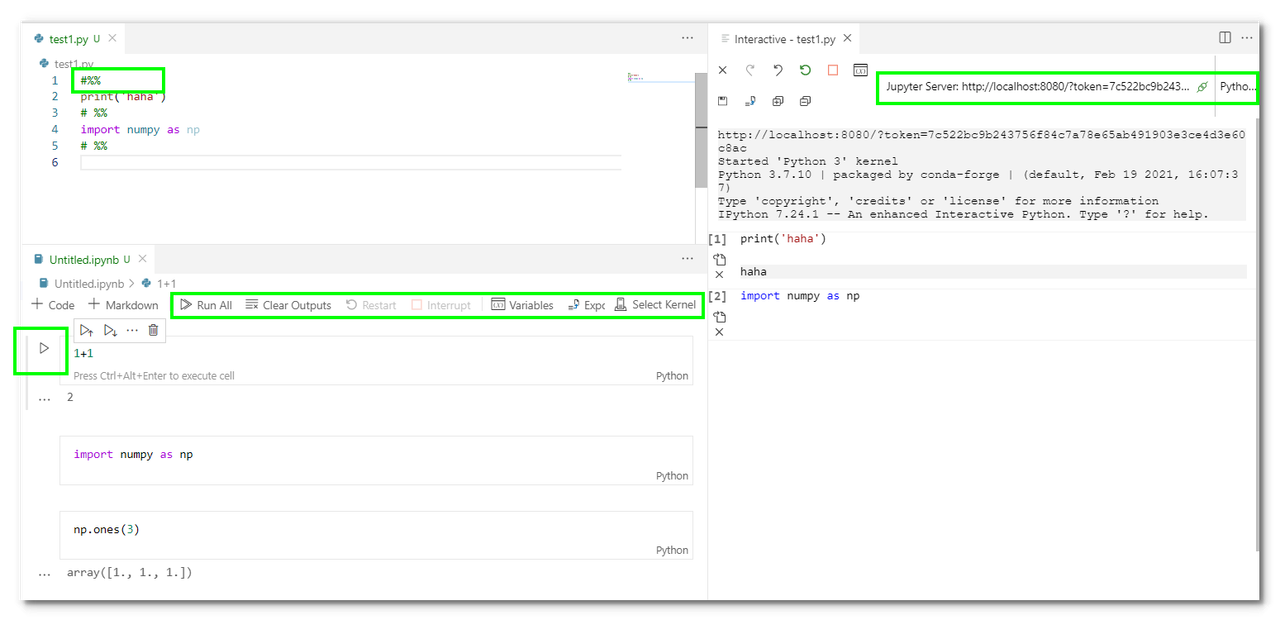
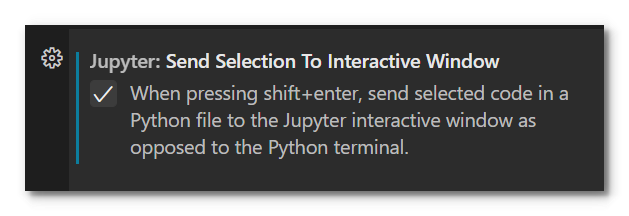
VS Code Key Binding


Kaggle API & GCS API
Setup Kaggle API - upload your Kaggle security token to the instance with software like
FileZilla. The destination directory should be/home/.kaggle. Then we install Kaggle API by running the following commands:$ sudo apt-get update $ chmod 600 ~/.kaggle/kaggle.json $ sudo python3 -m pip install --upgrade setuptools # pip install --upgrade --force-reinstall --no-deps kaggle kaggle-cli $ sudo python3 -m pip install kaggle $ kaggle competitions list $ kaggle competitions download -d <user-id>/<project-title> $ kaggle competitions download -c <competition-title>Install the 7Zip compression tool.
$ sudo apt-get install p7zip-full
$ 7z x <compressed-file>.zip -o<output-folder>
Setup GCS API - upload your GCS json file and set up the environment variable associated with it. That’s it.
$ export GOOGLE_APPLICATION_CREDENTIALS="~/.kaggle/gcs.json"
$ chmod 600 ~/.kaggle/gcs.json
Then you can upload/download files between GCS and the container.
import pickle
from google.cloud import storage

project = "strategic-howl"
bucket_name = "gcs-station"
storage_client = storage.Client(project=project)
bucket = storage_client.bucket(bucket_name)

source_blob_name = "tps-apr-2021-label/df.pkl" # No prefixed slash
destination_file_name = "/kaggle/working/df.pkl"
blob = bucket.blob(source_blob_name)
blob.download_to_filename(destination_file_name)
df = pickle.load(open(destination_file_name, 'rb'))
Google Source Repositories
In GCP console, enable “Cloud Source Repositories API”
Create a new repo or mirror an existing one (see the details in [6]).
In GCloud command line, change to the project associated with the repo
gcloud config set project [PROJECT_ID]From GCP console, go to “Cloud Source Repositories”
Clone the repo to your instance
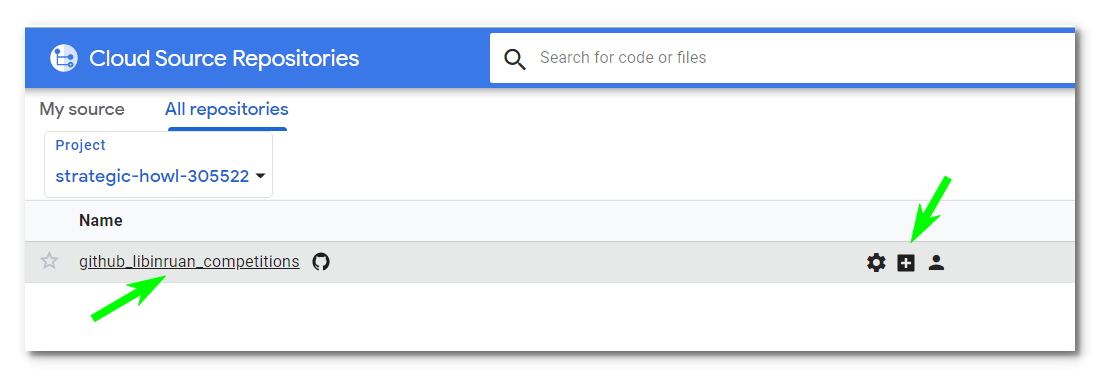
In this example I want to clone a mirror GitHub repo from my Google Cloud Source Repositories:
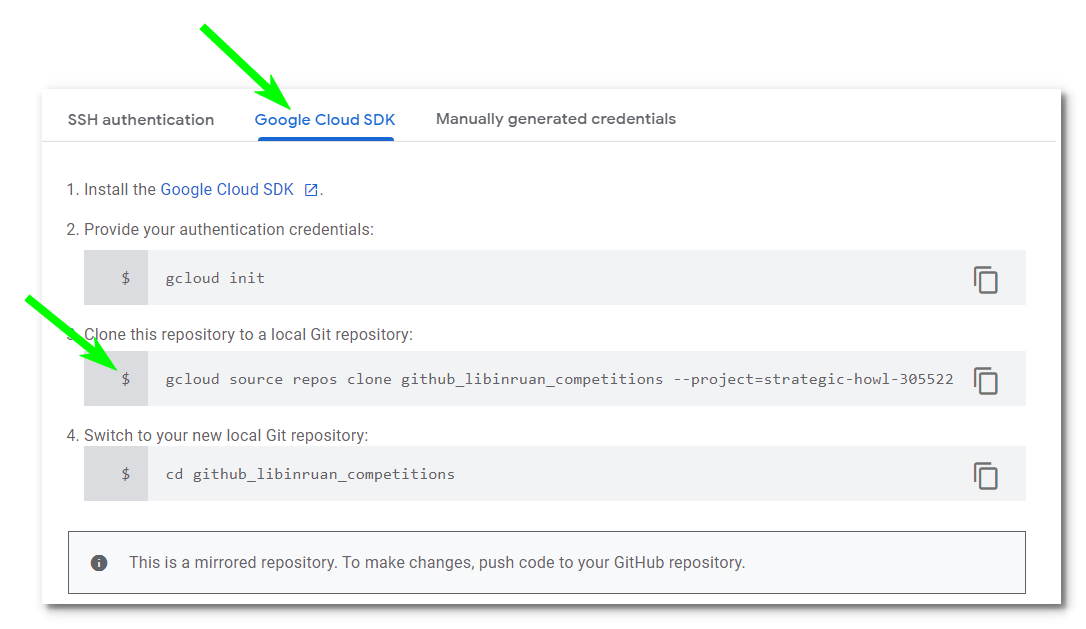
Launch a browser to see the remote Jupyter server. Navigate to the directory
/kaggle/working. Copy and paste the command provided in the prompted window into your GCloud command line console:# Copy and paste the command from the prompted window into GCloud command line console. For example, $ gcloud source repos clone github_libinruan_competitions --project=strategic-howl-305522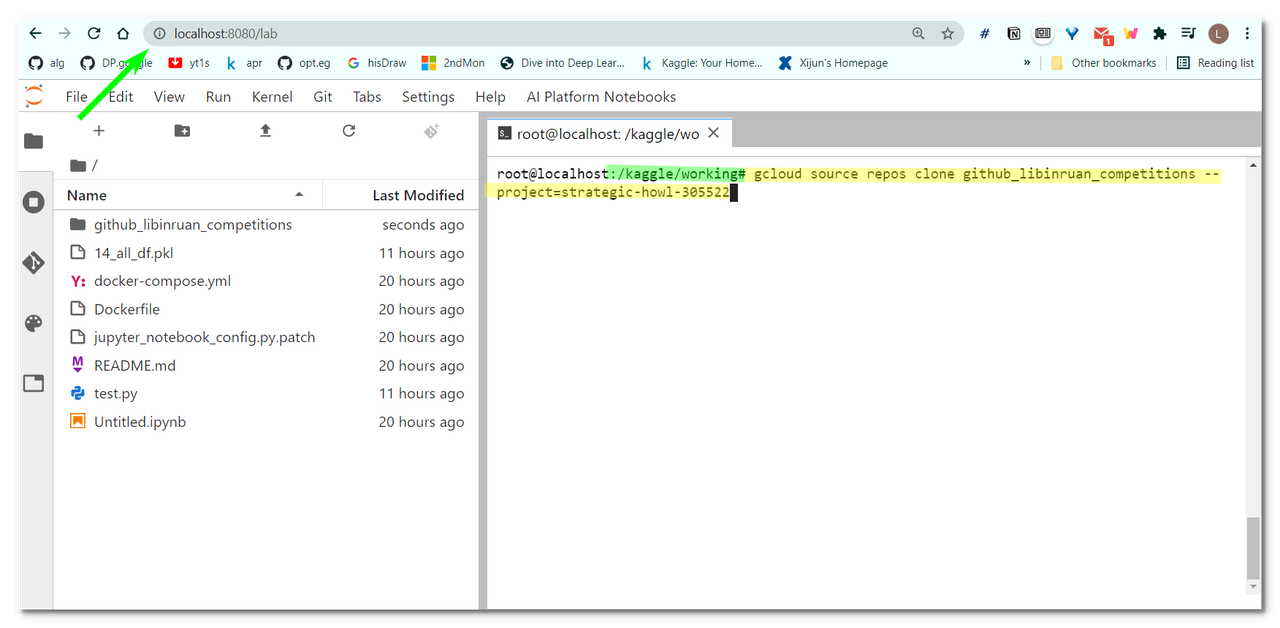
After this step, your mirror repo is ready to use. You may push code to the GitHub repo now.
Import custom modules in Jupyter
Reference: stackoverflow
Inside a container, without any virtualenv it might be useful to create Jupyter (ipython) config in project folder.
For example, the project folder is /kaggle/working/TPU-2021/may.
# create a folder called 'profile_default' inside /kaggle
$ cd /kaggle
$ mkdir profile_default
$ nano ipython_config.py
# paste the following command into the python file
c.InteractiveShellApp.exec_lines = [
'import sys; sys.path.append("/kaggle/working/TPU-2021/may")'
]Restart your Jupyter server. Type print(sys.path) to check if the path is in effective.
Now you can do imports in your notebook without any sys.path appending in the cells:
from mypackage.inside.the.folder.may import myfunc1, myfunc2Recreate log file
If your docker log file is too large to browse, recreate one.
$ docker-compose down
$ docker ps -a # not necessary
$ docker-compose up --force-recreate
Routine for reconnection
- Go to AI Platform > Check and start the instance.
- Go to Compute Engine > copy the assigned External IP.
- Launch VS Code, open Remote Window, and open SSH configuration file. Then edit
C:\Users\[UserName]\.ssh\configto update the HostName with the assigned External IP. - Check to see if
- Go Remote Explorer and click the remote machine.
- Go to Extensions to see if Python, Pylance and Jupyter have been installed.
- Navigate your way to folder kaggleenv and run
docker-compose logs, if you don’t know the URL of your Jupyter server. - Press Ctrl+Shift+P, and look for
Jupyter: Specify local or remote Jupyter server for connections. - Open folder
/home/[UserName]]/kaggleenv/. - Create a new
.pyfile. Run cell to launch the Interactive window. Or click Ctrl+Shift+P and look forJupyter: Create New Blank Notebook.